
How to Trade Using FVG and Order Blocks on Pocket Option
A trader I know once sent me a screenshot of a trade: he entered a long position exactly according to the pattern; the price reached his zone, barely touched the edge—and reversed a couple of seconds before expiration. It’s frustrating, but it wasn’t a fluke. He was trading a typical imbalance gap without tying it to anything else, and such a zone on its own triggers a reaction in about half the cases, no more.
We often see the same pattern among beginners on Pocket Option: the indicator spots a gap, a trade is opened—and the price plows right through the zone as if it didn’t exist. The difference becomes apparent when there’s also an order block beneath the gap. Then the zone ceases to be a random mark on the chart and becomes a place where large orders were actually placed.
Imbalance Zone and Order Block—What to Look for on the Chart
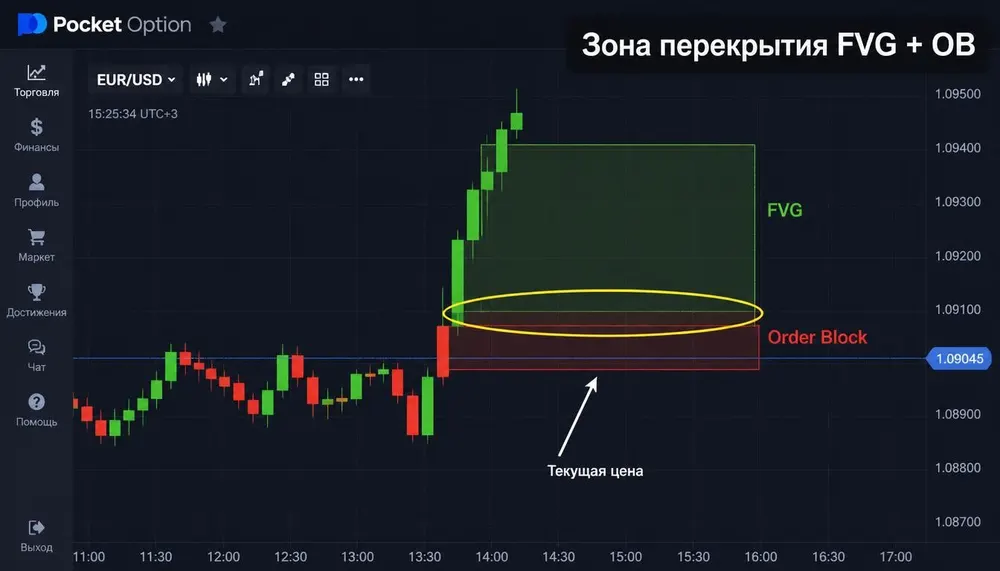
The Fair Value Gap is a pattern formed by a sharp price movement consisting of three candlesticks: the shadows of the first and third candlesticks do not intersect, and the gap between them matches the body of the middle candlestick. This is the imbalance zone—the point where one side of the market barely had time to trade against the other.
An Order Block is a related but distinct concept. It is the last candle moving against the trend before a sharp price surge: for a long trade, it is the last bearish candle before an upward surge; for a short trade, it is the last bullish candle before a crash. According to "smart money" logic, it is within the body of this candle that large orders accumulated, which then drove the price.
On their own, both tools are ineffective and often produce false signals. Analyses based on “smart money” concepts all agree on one thing: the intersection of an order block and an imbalance gap is the setup with the highest probability of a price reaction among all setups in this school of thought, because it confirms institutional interest through two independent indicators at once, rather than just one.
Step-by-Step Login Procedure
- Find a clear impulse on the chart—a series of candlesticks moving in one direction with minimal wicks and almost no corrections within the sequence
- Mark the FVG—the gap between the shadows of the first and third impulse candles
- Identify the nearest Order Block—the last candle moving against the trend immediately before the impulse
- Make sure that the FVG and OB zones overlap at least partially—if there is no overlap, the setup is not considered valid
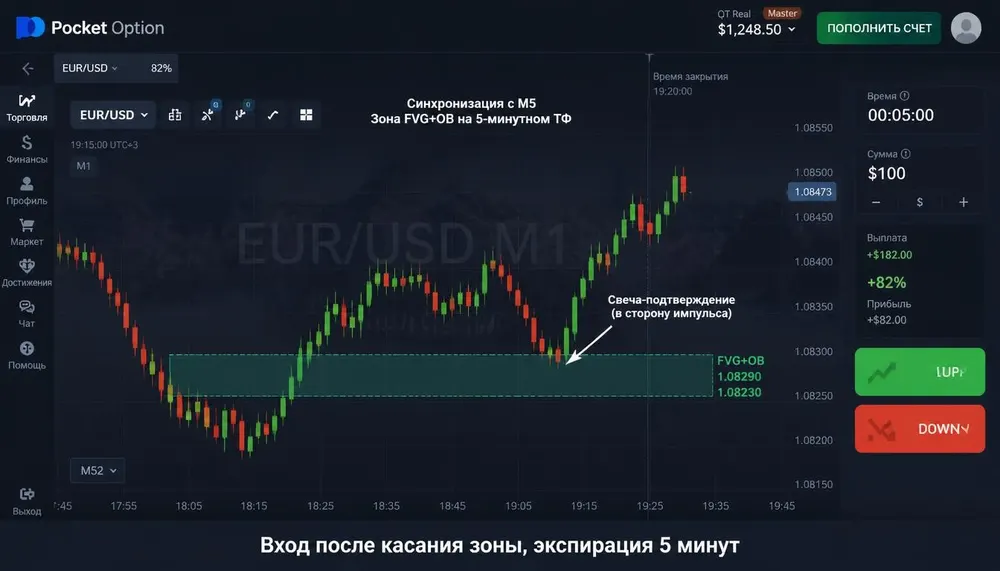
- Wait for the price to return to the overlap zone and for a confirmation candle to appear in the direction of the initial impulse
- Open a trade in the direction of the momentum—Higher if the momentum was upward, Lower if it was downward
The same principle applies here as when changing lanes on a highway with heavy traffic. An experienced driver doesn’t change lanes at the first available gap—he waits until both the mirror and the blind spot confirm that the road is clear. One confirmation is a risk; two that match is already an informed decision. FVG without OB means a gap in the mirror without checking the blind spot.
Expiration: How Many Candles Ahead Should You Place a Trade?
For a single FVG on Pocket Option, a proven strategy has long been described: look for a gap on the 5-minute chart, refine the entry point on the 1-minute chart, and open a trade with a 5-minute expiration the moment the price touches the zone. For a combination of FVG and Order Block, the logic is the same, except the entry zone is more precise—and this allows you to extend the expiration time slightly, because the signal is stronger than that of a single gap.
On a one-minute chart for scalping, the expiration is usually set 3–5 candles ahead, that is, 3–5 minutes. On a five-minute chart, it’s 15–25 minutes, respectively. The logic is simple: the larger the timeframe used to mark the zone, the longer it takes for the price to react to it. There’s usually no point in setting the expiration at 1–2 candles below the FVG+OB combination—the price often tests the zone first, and the reversal occurs on the second or third attempt.
 Input via the FVG OB signal
Risks and Common Setup Mistakes
- Marking an FVG without checking if there is an order block nearby—in that case, the zone turns into a regular gap with a random reaction
- Ignoring the direction of the higher timeframe—a trade against the overall trend, even in an ideal zone, performs noticeably worse
- If you enter the zone immediately upon touching it, without a confirming candle, the price often breaks right through the zone and only then reverses
- Increasing the bet amount after a losing streak instead of analyzing why the setup didn't work
- Trading the FVG+OB pair amid news events, when sharp price movements disrupt the very logic of the zones
The amount per trade should not exceed 1–2% of your deposit, no matter how obvious the setup may seem. We’ve written separately about proper risk allocation and capital protection in binary options in our article on risk management—the analysis there isn’t tied to any specific strategy and is applicable to this combination as well.
The overlap zone between the FVG and the Order Block doesn’t provide 100% reliable signals—it offers a more meaningful reason to enter the market than a single gap or a single block on its own. The next question is whether you’re willing to spend the time identifying two zones instead of one, or whether it’s easier to look for something faster and less precise—and here, each trader decides for themselves by reviewing their statistics in the Trading Journal.
Open Trading Journal →